Sure, he was one of the most brilliant military leaders of all time, but we might be able to credit Napoleon with another great feat—a pastry known in France as Bûche de Noël, also called the Yule Log.
Now, Napoleon didn’t invent the Yule Log, but he may have inadvertently spurred its creation. By most accounts, the Yule Log dates back to pre-Christian times. People in parts of Europe and England would burn a log as part of their Winter Solstice festivities. The tradition continued through the centuries and became associated with Christmas celebrations—that was until a French leader became concerned with his people’s health in the early 1800s. The story goes that Napoleon objected to the people burning logs in their homes, thinking it would make them ill. Without an actual log to burn the French turned to a new idea—a pastry shaped like a Yule Log.

Jacques-Louis David (1748-1825), Napoleon Crossing the Alps, 1800, oil on canvas.
Thank you, Bonaparte! The Yule Log has now become a staple of holiday celebrations. It’s a once a year type of treat for good reason: A Yule Log is a complex confection made of a sponge cake filled with pastry cream and then coated in butter cream frosting. You can use a fork to create a bark-look on the cake. Often meringue mushrooms, marzipan holly berries, and other decorations complete the look.

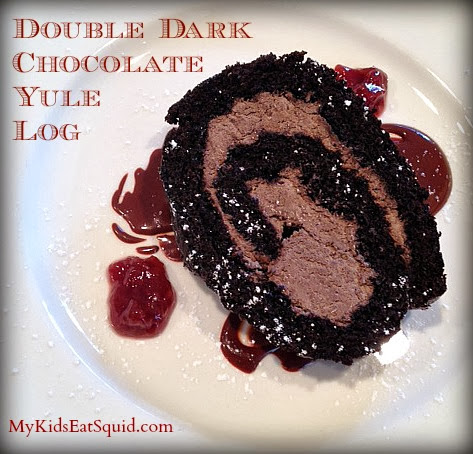
For our Yule Log I keep the decorations to a minimum. I skip the butter cream frosting, and concentrate on adding layers of flavor to the pastry cream tucked inside. For my version I add in melted dark chocolate and cocoa. You can mix in peppermint extract and pieces of crushed peppermints, or raspberry jam, coconut, or whatever flavors appeal to your family.
Play up the swirl design on the plate by adding a drizzle of fruit syrup and/or chocolate syrup before placing a slice of cake on the plate. Dust with powdered sugar or cocoa.
Double Dark Chocolate Yule Log Recipe
Ingredients:
Sponge cake
4 eggs
1 ½ cups sugar
1 cup + 2 tbsp. flour
1 ½ tsp. baking soda
¾ cup cocoa
¾ tsp. salt
¼ c. + 2 tbsp. water
2 tsp. vanilla extract
Filling
2 cups whipping cream
½ cup powdered sugar
2 tbsp. cocoa powder (dark cocoa preferred)
¼ cup Semi-sweet chocolate, melted and cooled
2 tsp. vanilla extract
Directions
1. Prepare a jelly roll pan by doing the following—lightly coat a 9 x 13” baking sheet with cooking spray. Place parchment paper onto the pan and lightly coat it with cooking spray and sprinkle liberally with flour.
2. Preheat the oven to 350 degrees Fahrenheit.
3. In a large bowl beat 4 eggs on high for 7 minutes.
4. In another bowl whisk together the sugar, flour, baking soda, cocoa, and salt.
5. Add the dry ingredients into the beaten eggs. Mix thoroughly.
6. Beat in the water and vanilla extract.
7. Spread the batter evenly onto the parchment paper—it will be thick.
8. Bake the cake for 10-12 minutes. (When you touch the cake it should spring back.)
9. Let the cake cool on a rack, in the pan, for 15 minutes.
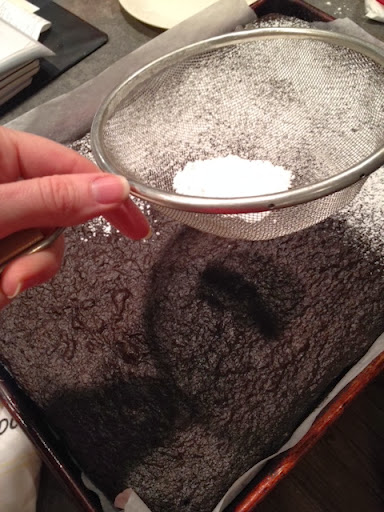
10. Dust the cake liberally with powdered sugar. Lay a cotton kitchen towel onto the top the cake. Now for the fun part—flip the pan over. Gently pull the pan off of the cake. Roll the cake up (with the parchment still on it) short end to short end. Let the cake sit rolled up for 15 minutes.

11. Beat the whipped cream until it just begins to become stiff. Add in powder sugar, melted chocolate, and cocoa. Beat again until stiff (just don’t overdo it!).
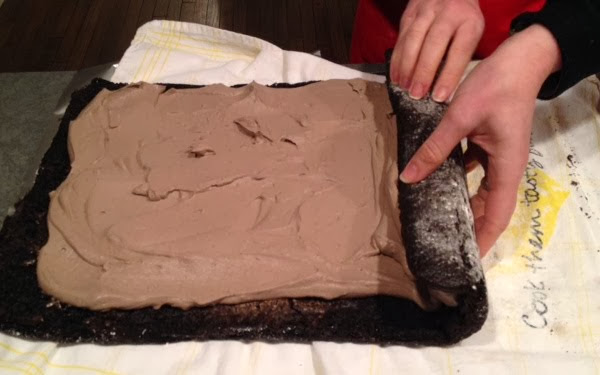
12. Here’s another tricky part: unrolling, filling, and rerolling the cake. Place a large piece of aluminum foil under the rolled up cake. Unroll, remove the parchment paper (the kitchen towel is still underneath). Spread the cocoa whipped cream onto the cake. Roll the cake up short end to short end. What I do is once the cake is rolled up, roll it right onto the aluminum foil.


13. Bring the aluminum foil around the roll completely. If the roll is at all misshapen now’s the time to form it.
14. Freeze the roll overnight before serving.
15. Cut the cake into thick slices and serve with raspberry sauce, chocolate sauce, and however you’d like to decorate it.
Enjoy - and raise a toast to Napoelon!
Kristen J. Gough is the Global Cuisines & Kids Editor for Wandering Educators.
All photos courtesy and copyright Kristen J Gough
