
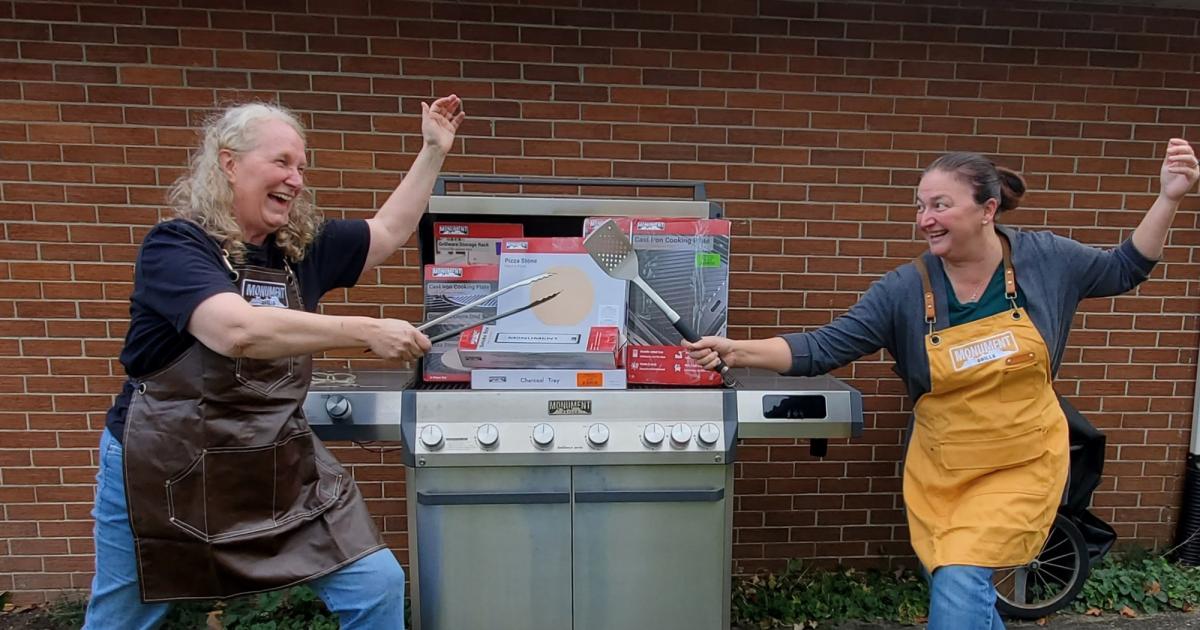

A box arrived from Monument Grills. Then another one. Then a third, and more, and by the time we had everything out on the patio, the stack was almost taller than the grill it was sitting on (we did not measure, but we did stand back and hungrily look at it for a hot second).
Three cast iron cooking plates. A pizza stone. A cast iron round cooking plate, the comal. A round cast iron diamond cross grid. A smoke box, a charcoal tray, a grillware storage rack, a stainless steel tool kit, and two aprons (one coffee-brown durable, heat-resistant fabric, one mustard yellow canvas, and yes, we put them on immediately!). We were perfectly attired for a SWORD FIGHT!
Standing there looking at the pile of future deliciousness, the question was not whether any of it was any good (we know that it is). The question was what on earth do you DO with all of this?
We answered it the only way that made sense. We cooked a whole meal on a sunny fall day here in Michigan. It was fabulous.

Granny's roasted potatoes. Pizza for a crowd, three ways. Apples on the grill, with crepes. One course per accessory, start to finish, in a single afternoon. It was a GREAT day.
What I did not expect was how much of my family would end up in it. The potato recipe is my granny’s. My sister is in half the photographs, holding a spatula like a sword, laughing. And my mom has been asking about the fall-themed crepes since the day the boxes came. Three generations are in this meal, which is not something I planned (and is now the part I cherish most).
Monument Grills sent us these accessories to try.
What actually came in the box

Everything arrived at once, which is how we ended up cooking a whole meal instead of testing one accessory at a time.
Because product photography always makes a package look tidier than it is: this is a lot of equipment. If you are buying for somebody who already has a grill and has never bought a single accessory for it, you do not need all of it, and our sections below say which pieces actually changed what we could cook. If you’re looking for an impact gift, go ham! They will certainly appreciate ALL the goodness. If you’re looking to add a single piece of equipment to a grill set-up, watch how they cook a meal on the grill, and see what’s missing. This kind of gift is thoughtful for both the cook and everyone who enjoys their meals.
Granny's roasted potatoes, on the cast iron plate
Use: the cast iron cooking plate, ridged side up. (This is the recipe I was most excited about, and the one I have been eating the longest – for DECADES!)
My granny was an excellent cook (and she trained generations of excellent cooks in our family by always having us help in the kitchen. LOVE.). Granny made these potatoes often, and in the oven. My mom had the brilliant idea of making them on the grill. Now, that’s the way we do them.
The trick for these potatoes is to use small ones, and give it a certain je ne sais quoi with the seasoning.
Granny’s roasted potatoes
These are the ABSOLUTE BEST, and make at least double what you think you will need, because the best part about being the cook is the “sampling” that occurs throughout.
- Small potatoes
- Really good bread (stale is best)
- Butter and olive oil
- LOTS of garlic and onions, chopped
- Salt and any preferred seasoning. I keep it simple with just salt and occasionally some smoked paprika. Others in our family use their favorite dried herbs or seasoning blends.
Parboil the potatoes. Tear the bread into irregular chunks. This is critical! You want as many rough edges as possible. Quick run the bread chunks under a light spray of water. You only want it a bit softened, not wet. Toss the potatoes and onions with a mix of melted butter and olive oil. Put them onto a cast iron cooking plate on the grill, at whatever temp you are cooking your other meal segments on. Turn every 5 minutes or so. If you like your potatoes smashed (more rough edges), now is the time to do that. When the potatoes start to get browned, toss the garlic and the bread with a little olive oil and then add the garlic and the bread pieces to the grill plate. Use your long tongs to toss them together. Keep an eye on this dish, now. You don’t want the garlic or bread to burn, and you want everything to crisp up beautifully. THIS is the perfect time to sample your cooking to ensure maximum crispness.
Why a plate rather than straight on the grates? Because Granny’s potatoes have MORE than potatoes in them; it’s important to keep it all together. Those delicious crunchy tidbits would fall into the grill and burn away, making us all cry.
The plate is two-sided, ridges on one face and flat on the other, and we ended up using it for three of the four courses. You will see it again two courses from now, flipped over (which is a sentence I did not expect to write about a piece of cast iron).
We have three of these cast iron griddle plates. They all fit the width and length of our Monument grill, with a little space in between each. You can take out the grill plates and put them in that space, or put them atop the grill plates, your choice. They are heavy, but can be moved quite easily. There’s a little cut out on one end. Put that nearest to you, so that you can use something to grab it and move it if you need to while it’s on the heat. These grill plates heat fast. They come up to temp as the grill does. The best part of all with this grill plate is that you can use it on the ridged side for grill marks and even cooking, or flip to the flat grill side and make your smashburgers (incoming!!) or cooked cranberry apples (see below).
Monument notes for seasoning and cleaning: Season before the first use. Wash with warm water and a little dish soap, rinse and dry completely, then coat the plate and sides with a thin layer of high-smoke-point oil. Bake it upside down at 400–480°F for 1 hour and let it cool in the oven; repeat 2–3 times for a new plate. After cooking, clean with hot water and a soft brush, dry it thoroughly, and avoid soap.
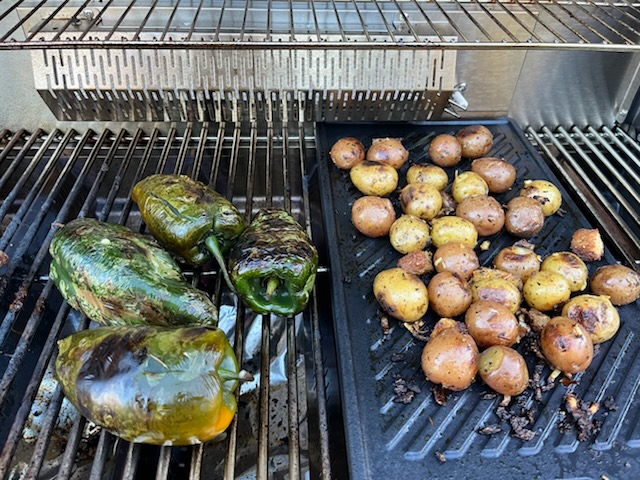
Granny made these in the oven. Mom moved them to the grill. The poblanos weren’t even part of the plan. Mom put them on because the grill was already running!
How to feed a crowd: pizza, three ways
Use: the pizza stone, plus the cast iron plates flipped to their flat side.
Running all three at once is the trick here. One stone makes one pizza at a time. A stone and a flat plate make two, and one stone and two flat plates make three, which is the difference between feeding a few people and feeding everyone who turned up. (Three pizzas at once! When there are eight people in the yard and they are all hungry, this is called being prepared.) Also, the more pizzas you make, the better you can customize to dietary needs or preferences. If you have a big enough grill to cook three pizzas, you can feed approximately 8 people if you have sides, or 5 if this is it on their plates. Ask me how I know!

This is what a flat cast iron plate does that grates cannot. No sagging, no toppings lost to the fire, and a bottom crust that actually crisps. YUM.
Pizzas three ways
Make or purchase your dough, in the quantity of the pizzas you want to make. We have a great source for pizza dough made from simple ingredients, including 00 flour from Italy, but any store’s refrigerated dough will do. Let it sit to room temp for at least 30 minutes to get a good dough rise going.
Assess the toppings that people like and prepare to customize.
Here are the three that we made for this meal:
- White pizza: sauce of olive oil, chopped basil, chopped garlic, and a pinch of salt. Toppings: torn spinach, crumbled cooked sausage, dollops of fresh ricotta, shredded mozzarella, crispy cooked bacon. Finish post-grill with torn fresh basil.
- Traditional pizza: marinara sauce (we like Rao’s), cooked sausage, crispy cooked bacon, crumbles of fresh ricotta, a few olives (ran out! Alas!), mozzarella, and finished after grilling with torn fresh basil.
- Allergic to dairy pizza (this one is for my husband!): Rao’s sauce, chunks of Vidalia onion, LOTS of chopped garlic, crumbled cooked sausage, crispy cooked bacon, no olives which made him sad, and BIG chunks of dill pickle. I know. But he loves it.
Cut parchment paper to fit the pans you will use. We put the crust with the most dough onto the pizza stone, as my parents prefer a thicker, more risen crust. This one went straight to the middle of the grill. We made thinner crusts on the grill plates, due to taste preferences.
Preheat your grill, including pizza stone and flat griddles. While they are preheating, divide and then pat out your dough on the parchment paper. This can be hard! Persist! Then add your sauce and toppings, and head out to the grill. Slide each onto the cooking platform you’ve got the parchment paper cut for. This is easy with the long tongs that came in the stainless utensils accessory box. Turn the heat down to about medium once they are in, so that your crust cooks evenly and doesn’t get burned. Cook until the crusts are cooked and the cheese is deliciously melty. All of our pizzas finished cooking at the same time.
Turn the grill off. Use tongs and the flipper to maneuver each pizza onto the back of a large oven pan (this is your impromptu pizza peel). Cut and serve! We like to do square cut because some people want more crust, as they do not like as much cheese (who are they? Unnamed, but I’m grateful because I want ALL THE CHEESE).
Everybody worries about the same thing with a pizza stone, which is whether it will crack. It did not, and here is how we grill with it:
We put the cold pizza stone into a cold grill. We preheated the stone while the grill was preheating (up to temp, which for us was 500°). We didn’t remove the pizza stone or the griddles until they and the grill were completely cooled down. We rinsed the stone and the griddles with water. They weren’t hard to clean, because we’d used parchment paper. Note: be sure to cut the parchment paper SMALLER than the edge of the stone or griddle, so as not to catch fire.
And the question a griller will have before any of that: is a pizza stone on a gas grill better than a pizza stone in your oven? ANYTHING IS BETTER ON A GRILL. Full stop. We grill almost every day, even in our brisk Michigan winters. Yes, in blizzards, we’ve shoveled many feet of snow away from the grill so we could make lunch. That’s how we roll!

All three came off at the same moment. Look at those flames, at that rise!
Apples on the grill

Dessert setup, before anything went on. The flat griddle and the crosshatch plate for the apples, the comal for the crepes. The griddle is sitting down in the space where a grate came out while the other two are on top of the grates, and we could not tell any difference. Also: note those fabulous long tongs!
The round diamond cross cast iron grid is small and round, which makes it the fiddliest thing in the box and also the most fun. We grilled fresh Michigan apples on it, which is an apt test, because apple slices are small enough to fall through a grate. This grid has a porcelain-enameled surface, and is cross-hatched so you don't have to keep moving the food to get double grill marks (heh heh). An extra bonus is that it is easy to clean! Preheat your grill to 400.
Smitten in the Mitten grilled apple cranberry crepe filling
Note: You will want to grill as many apples as you have people for. Count on at LEAST one apple per person.
- Apples (local is best, especially here in West Michigan, which is a fruit belt!). I used local Smitten apples, because I love the sweet/tart taste, and two Pink Lady apples that were not as crispy as I wanted to eat plain, but would do quite well grilled. Cut into fourths, core, and then make slices that are on the thinner side. You want them thick enough to not burn, and thin enough to actually get soft.
- Splash of lemon juice
- Dash of cinnamon (to taste! We are heavy handed here for ours)
- Big handful of fresh local cranberries
- Pinch sea salt
- Some brown sugar, to taste (none for me, double for my parents)
- 2 T melted butter
Mix the ingredients. Spread on a preheated griddle. If you want pretty apples with cross-hatch marks for presentation, use the round crosshatch plate for some. Don’t get any cranberries on that, as they will fall through the holes. Flip and stir around on the griddles until softened and caramelized.
Verdict: This crosshatch plate will be incredible for grilling meats. It was a challenge to flip the apples without sacrificing them to the fire. They looked beautiful, though, which was worth the effort. Cleaning it was as easy as cleaning a flat griddle – scrub and done.
Do not eat these yet. They are going in the crepes!

Dessert being built on two accessories at the same time. The apples finish while the first crepe goes onto the comal, and nothing has to wait its turn while the other cools. We all want a still-warm fall filling in our crepes.
Smitten in the Mitten Crepes, which my mom has been waiting for
We are using the cast iron comal. (If you have not met one, a comal is the flat griddle that makes tortillas, and it is the perfect tool for anything that has to be thin, even, and gently cooked). A comal is an extraordinary pan with many uses.
Crepes are the most laborious thing in this whole meal, and not because the batter is difficult (note: make the batter ahead. It’s best when it rests!). They need an even heat held steady, which is exactly what can challenge you when using a gas grill, and paying attention to doneness. Each crepe takes less than two minutes. If the comal can do crepes, it can do anything you will ask of it! One thing that is a bit different about cooking them on a comal in the grill. You can’t lift and swirl the pan to spread the batter, but must spread it thinly with a silicone spatula.
Our whole family loves crepes. I grew up with them, and when my brother studied abroad in France, he came back ever more ready to spend the time to make them. Of course, we got special crepe flippers as a souvenir gift when he returned (thank you!), and perfect crepe pans. Foodies are going to food, let’s be honest.
When I told mom that the comal was perfect to make Smitten in the Mitten grilled apple cranberry crepes, she was ready to calendar it that day. You will, too! Finally, I made them and then had to make another batch right away, they were so incredibly delicious.
Preheat your grill to 400. Add on a flat griddle plate, the comal, and the cross-hatch grid. You will keep it around 350-400 the entire time, because the grill will stay open for the most part, while you are tending your crepes.
Crepe batter
- 1 cup of flour
- 1 cup of milk
- 2 eggs
- 2 T melted butter
- a pinch of sugar, if you'd like
- a pinch of sea salt
Mix up the crepe batter with a whisk, and then let it sit in the fridge for at least an hour. We often make the batter the night before, so we don't forget. Whisk it again when you're ready to cook the crepes. Heat the comal, and brush it with melted butter. Put 1/4 cup of batter on the comal pan, and quickly push it around with a silicone spatula so that it gets really thin. When bubbles start to come around the edges, flip the crepe with a thin, long flipper. It will be less than a minute per side. Then when it is done, put it on a plate and finish cooking the crepes.
To assemble the filled crepes
Lay a crepe flat on your plate. Smear a little sour cream on the middle, from top to bottom. Add your apple-cranberry goodness, and pile it high! Dollop or spray some whipped cream on top. Fold over each side to cover the middle. DIG IN.
We first ran the crepe batter recipe years ago in a review of a children's book about Bastille Day, which is not where most people go looking for crepes. Crepes for Bastille Day is still there, and the recipe still works. Our daughter is no longer 6 years old, and yes, she still makes them with the same joy she did then. Her favorite filling is grilled peaches to this day.
Now to answer the question a griller will actually have. The cast iron plate already has a flat side. Why would you own a comal as well? We absolutely LOVE using a comal, and every person in our family has a tried and true one in their kitchen. It’s the perfect shape and composition for tortillas, fried eggs, or for cooking something you want contained in an edge. On the grill? It’s such a joy to cook on.

Apples, cranberries, cinnamon. The cranberries burst as they cook and stain everything pink! Just LOOK at that caramelization.

Sour cream underneath, apples and cranberries piled high, whipped cream on top. Mom had these crepes on the calendar the day I started thinking about making it.
The rest of the box
Three things came in the package that did not get a course of their own:
The aprons. They are in the photograph at the top of this article doing exactly what aprons do. The heat-resistant fabric will get its REAL test when I smoke some meat on it for pulled pork (recipe incoming!). The canvas is easily washable (yes, pizza sauce drip, lived it, ope). The pockets are the best part, and hold so many things that you can easily grab (including the phone, for pictures!).
The stainless steel tool kit. There is only ever one question worth asking about tongs, which is whether they are long enough to keep your hand out of the heat. These? Yes, yes they are. Grateful for these in my tool kit. We only had shorties before, and it was a bit tricky to be fast to flip without facing the high temps.
The grillware storage rack. This mounts on the side of the grill. There are two holes there specifically for it. While I am not planning to keep my cast iron accessories outside in a Michigan winter, the sturdy rack holds THREE cast iron griddles or plates without any weight or bending issue. This is an incredibly easy storage system, well worth utilizing.
What we have not cooked on yet
Two pieces that I’m quite excited about are still in their boxes: the smoke box and the charcoal tray. Between them, they turn a gas grill into something that will smoke, which requires more planning than our family meal this week.
We are saving them for January, because holiday meals are getting in the way, and also grilling in a Michigan winter is more of a challenge than anybody admits. Most people assume it cannot be done at all, and my brother (the firefighter, and the one in this family who actually knows what he is doing with smoke) is in on it. Well, unless Ed wants to get some charcoal smash burgers going sooner, in which case, will report back. Watch for that one!
What we would actually buy
If somebody gifted you this entire set of accessories, you would use all of it. Almost nobody is buying the entire package, so if I could only buy one piece, I would honestly start laughing and tell you there’s a tie game going on. I ADORE the comal pan. My comal pan in my kitchen is one of my most used pans, and the grill one is no different. My other favorite is the griddle. Again, a griddle is another one of my most used pans in the kitchen, so it’s not a surprise that I’m loving the outdoor grill versions. And I know before we even use them that the smoking box and charcoal tray will become favorites. Give me ANYTHING to smoke and we know that the deliciousness has landed.
Our grill is a major player for our family meals. It handles any recipe we throw at it with aplomb. I’m always learning, and always wanting to try new things. These accessories helped with that! This food day, with a meal that featured my granny's potatoes, my sister in an apron playing fencing with me, and my mom waiting on the crepes, made a fall meal more than festive. It filled our stomachs with love.
More from Wandering Educators on grilling and good food
- Monument Eminence 605 Grill Review
- Turn Any Grill Into a Smoker: Summer Grilling Tips
- Hi Mountain Seasonings at 35 Years
- Crepes for Bastille Day
Jessie Voigts is the founder and publisher of Wandering Educators. She has a PhD in International Education, has lived and worked in Japan and London, and traveled around the world. She is constantly looking for ways to increase intercultural understanding, and is passionate about study abroad and international education.